
Can You Change Your Own Brake Pads? A Mechanic’s No-BS Guide
If your brake pads are worn, yeah, you can often replace them yourself as long as you’ve got some basic mechanical experience, the right tools, and a safe place to work.
It’s not the hardest job I’ve done in a garage. But brakes aren’t the place to rush or guess. One small mistake can turn a simple pad swap into a much bigger problem.
I’ve spent years working on cars, and I’ve seen plenty of brake jobs that started as an easy DIY repair and turned into a mess because somebody skipped an inspection or used the wrong procedure.
The good news? If you’re comfortable changing a tire, using basic hand tools, and following instructions carefully, a normal disc-brake pad replacement is often within reach.
The key is knowing when you can handle the job yourself and when it’s smarter to stop and get help.
Table of Contents
What Kind of Brakes Does Your Car Have?
Most DIY brake-pad jobs involve disc brakes, especially on the front axle. Some vehicles also use rear disc brakes, while others use drum brakes at the rear.

Disc Brakes
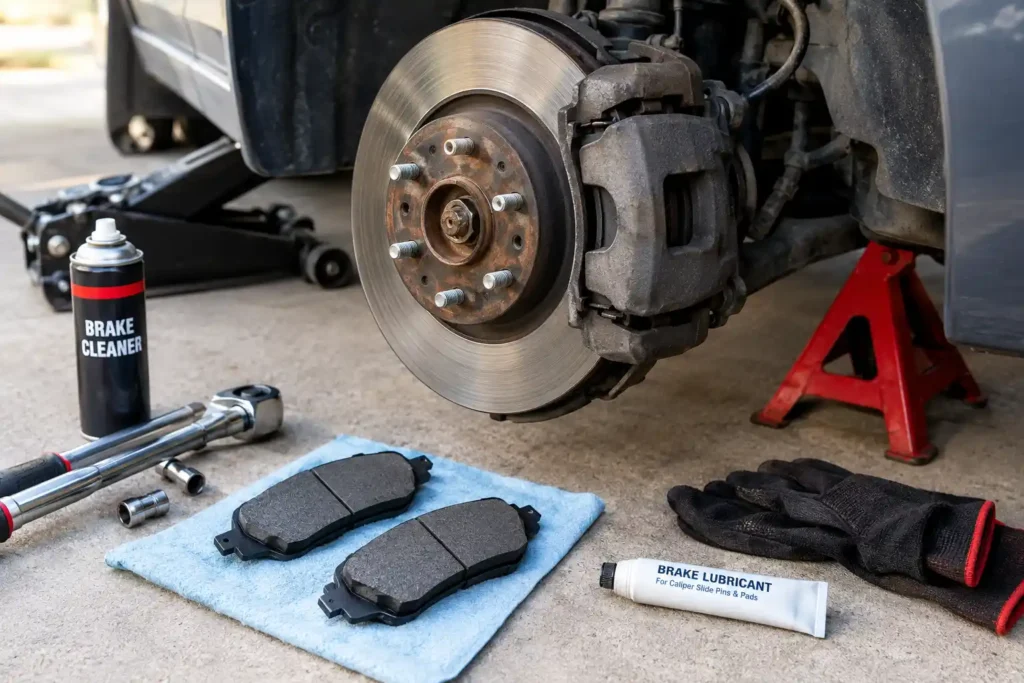
If you can see a flat metal rotor behind the wheel with a caliper gripping it, you’ve got disc brakes.
The caliper holds the brake pads and pushes them against the rotor when you press the brake pedal.
For a first DIY brake job, conventional disc brakes are usually the more straightforward setup.
Before buying anything, use your VIN or vehicle information to make sure you’re getting the correct pads. Brake parts can differ between engines, trim levels, model years, and even production dates.

Drum Brakes
Drum brakes are a different animal.
Instead of pads squeezing a rotor, brake shoes press against the inside of a drum.
You’ll find springs, clips, adjusters, and other hardware inside, and those parts can make the job a lot more involved.
If you’ve never worked on drum brakes before, I wouldn’t make them your first brake repair. Get familiar with the system before you take everything apart.
Hybrid and EV Brakes
Hybrids and EVs add another layer because regenerative braking does part of the work.
That often means the friction brake pads can last a long time, but it doesn’t mean you can ignore the brakes. Rotors can develop corrosion, and some vehicles require specific procedures or electronic service modes.
If you’re working on a hybrid or EV, check the manufacturer’s procedure before you start.
What You’ll Need Before You Start
Don’t begin a brake job by putting the car on a jack and then discovering you’re missing half the tools.
Get everything ready first.
Basic tools and equipment

- Floor jack that’s suitable for your vehicle
- Two properly rated jack stands
- Wheel chocks
- Lug wrench or socket
- Breaker bar if the lug nuts are tight
- Correct sockets for the caliper hardware
- C-clamp or the right piston-retraction tool, if needed
- Torque wrench
- Brake cleaner
- Brake-compatible lubricant
- New brake pads and any required hardware
- Safety glasses and gloves
And one big point: never rely on the jack alone to hold the vehicle while you’re working underneath it or around the wheel area.
Use properly rated jack stands at the manufacturer’s recommended support points.
How to Change Brake Pads Step by Step
Here’s where the actual work starts.
Take your time. A brake job isn’t a race, and there’s nothing wrong with checking something twice.
1. Park the car safely
Park on solid, level ground.
Put the transmission in Park if it’s an automatic, or in the appropriate gear if it’s a manual. Apply the parking brake when it’s appropriate for the axle you’re working on, and use wheel chocks so the vehicle can’t move.
Don’t start this job on a slope.
2. Loosen the lug nuts
Before lifting the vehicle, slightly loosen the lug nuts on the wheel you’re removing.
Don’t remove them completely yet.
It’s much easier to break them loose while the tire is still on the ground.
3. Lift and support the vehicle
Use the vehicle’s recommended lifting point.
Once the vehicle is raised, place the jack stand at the correct support point and lower the vehicle onto it.
Give the vehicle a careful stability check before removing the wheel.
If it doesn’t feel solid, stop and fix the setup before you continue.
4. Remove the wheel
Now remove the lug nuts and take the wheel off.
Put the wheel somewhere safe where it won’t roll into your workspace.
At this point, take a good look at the brake assembly before touching anything.
This is your chance to notice obvious problems like a damaged hose, a fluid leak, a badly worn rotor, or heavily corroded components.
5. Remove the caliper
On many conventional disc-brake systems, you’ll need to remove the caliper bolts or slide-pin bolts to access the pads.
The exact design varies by vehicle, so don’t assume every caliper comes apart the same way.
Once the caliper is loose, do not let it hang from the brake hose.
Support it securely with an appropriate hook or support.
The brake hose is not a piece of suspension wire. Treat it carefully.
6. Remove the old pads
Pay attention to how the old pads are installed before you remove them.
Some pads have wear indicators, clips, or different inner and outer designs.
Compare the old and new pads before installation.
If something doesn’t match, stop and check the part number and application instead of forcing it into place.
7. Inspect the rotor and hardware
This is a step a lot of beginners skip.
Look at the rotor surface.
Deep grooves, severe corrosion, cracks, or other damage can mean the rotor needs attention—not just new pads.
Also check the caliper hardware and slide pins.
If a slide pin is seized or badly damaged, don’t ignore it just because the new pads fit.
8. Retract the piston correctly
The caliper piston needs to move back far enough to fit the new, thicker pads.
The correct method depends on the brake system.
Some pistons can be pushed straight back. Some rear pistons need to be rotated while retracting. Certain vehicles require an electronic service mode.
Don’t force the piston.
If it won’t retract normally, find out why before you continue. A seized piston or caliper can turn a routine pad replacement into a bigger repair.
Also keep an eye on the brake-fluid reservoir while retracting pistons. The fluid level can rise as the pistons move back.
9. Lubricate only the correct areas
This is one place where more is definitely not better.
Use only a lubricant that’s suitable for brake components and recommended for the particular contact points.
Depending on the brake design, that may include certain pad contact areas or caliper slide pins.
Never put lubricant on the rotor’s braking surface or on the friction material of the brake pads.
If you’re unsure where lubricant belongs, check the pad manufacturer’s or vehicle manufacturer’s instructions.
10. Install the new pads
Install the new pads in the same positions as the originals, including any clips or hardware that came with the kit.
Make sure everything sits correctly and moves the way it should.
Don’t hammer a pad into place just because it seems tight.
A pad that doesn’t fit correctly needs to be investigated.
11. Reinstall the caliper
Put the caliper back into position and reinstall the correct hardware.
This is where your vehicle’s torque specification matters.
Don’t use a guess like “snug plus a quarter turn.”
Brake hardware should be tightened to the manufacturer’s specified torque using a properly calibrated torque wrench where required.
12. Reinstall the wheel
Put the wheel back on and hand-start the lug nuts.
Don’t cross-thread them.
Tighten the lug nuts according to the manufacturer’s recommended torque specification.
If the vehicle uses a specific tightening sequence, follow it.
13. Pump the brake pedal
This step is easy to forget and extremely important.
Before moving the car, press the brake pedal several times until it feels firm.
The piston was retracted during the job, so the first pedal presses may feel different.
Do not drive away until the pedal feels firm and normal.
If the pedal stays soft or goes unusually close to the floor, stop and find out why.
14. Test the brakes carefully
Start with a very low-speed test in a safe, clear area away from traffic.
Make sure the vehicle stops normally and doesn’t pull sharply to one side.
Listen for anything unusual.
If the pedal feels wrong, the vehicle pulls badly, you hear severe grinding, or something simply doesn’t feel right, don’t keep driving and hope it fixes itself.
Find the problem first.
And if the pad maker has a bed-in procedure, follow it. It matters more than people think.
When Should You Stop and Get Professional Help?
There’s nothing wrong with deciding a brake repair is beyond your current experience.
In fact, that’s a good mechanical decision.
Stop and get help if:
- The brake piston won’t retract normally
- The caliper is seized
- You find a brake-fluid leak
- The brake hose is damaged
- The rotor is severely damaged
- Hardware is badly corroded or broken
- The brake pedal remains soft after the repair
- Your vehicle requires an electronic brake service procedure you don’t have the equipment for
- You aren’t sure how the brake assembly goes back together
Don’t let the fact that you’ve already started the job pressure you into finishing it.
A brake repair is one of those jobs where knowing when to stop is part of being a good DIY mechanic.
How Do You Know Your Brake Pads Need Replacing?
Don’t rely on mileage alone.
Brake-pad life depends on the vehicle, pad material, driving style, traffic, terrain, and plenty of other factors.
Instead, pay attention to what the brakes are telling you.
High-pitched squealing
Some brake pads have wear indicators designed to make noise when the pad material gets low.
But squealing doesn’t automatically mean the pads are finished. Brake noise can have several causes.
Grinding
Grinding is a different story.
If you hear a harsh metal-on-metal grinding sound while braking, don’t keep driving around hoping it disappears.
The pads may be severely worn, and other brake components may already be damaged.
Thin brake pads
Check the actual pad thickness during inspection.
Around 3 mm is commonly treated as a point where replacement should be planned, but the correct minimum depends on the vehicle and manufacturer’s specification.
Pulling or unusual braking
If the vehicle pulls strongly to one side while braking, don’t automatically blame the pads.
A sticking caliper, uneven pad wear, a tire problem, or another brake issue could be involved.
Vibration
A shaking steering wheel or brake pedal during braking deserves an inspection.
It may involve the rotors or other components rather than simply worn pads.
FAQs
Can I change my own brake pads?
Yes, if you’re comfortable with basic mechanical work and can safely lift and support the vehicle.
But the exact difficulty depends on the vehicle.
A straightforward disc-brake setup can be a reasonable DIY project. A complicated electronic brake system may not be.
Do I need to replace brake pads on both sides?
Yes. Brake pads should normally be replaced as an axle set, meaning both sides of the same axle.
Don’t replace one front pad and leave the other old pad in place.
Do I need to bleed the brakes after changing pads?
Not normally, provided the hydraulic system hasn’t been opened and there isn’t another problem.
If you opened the hydraulic system, found a leak, replaced a caliper, or the pedal feels soft, the situation is different and the braking system needs proper attention.
Where should brake lubricant go?
Only on the specific metal contact points or slide components where the brake manufacturer or lubricant manufacturer calls for it.
Keep lubricant away from the rotor and pad friction material.
The Bottom Line: Brake Pads Can Be a DIY Job
Replacing brake pads isn’t some mysterious repair reserved for professional mechanics.
I’ve done brake work on everything from everyday commuters to high-mileage trucks, and the basic lesson is always the same: slow down, inspect everything, and don’t guess when you’re unsure.
The actual pad replacement can be fairly straightforward.
The important part is doing the job safely.
Use proper jack stands. Use the correct parts. Follow the vehicle’s torque specifications. Keep lubricant away from friction surfaces. Make sure the brake pedal is firm before driving.
And if you uncover a problem that goes beyond a simple pad replacement, don’t try to prove you can handle it.
Sometimes the smartest DIY decision is knowing when to put the tools down.
Your brakes aren’t the place to take shortcuts.
If you’re planning to replace your brake pads, save this guide before you start, check your vehicle-specific instructions, and gather everything you need first.
Pingback: Car Shakes When Braking? Fix Your Brakes Like a Pro
Pingback: 8 Car Dash Symbols: Meanings, Fixes & Expert Tips
Pingback: Water Pump Replacement: Critical Signs & Smart Timing
Pingback: Brake Master Cylinder Failure: Signs You Should Never Ignore
Pingback: What Does ESP Mean? Unlock Your Car’s Safety Secret
Pingback: Car Maintenance Checklist: 9 Steps to a Reliable Car